Saturday, October 29, 2011

Mummy Cups

Here are the Mummy cups I made for Super Kid's School Halloween Party! And the entire set all together :)

Halloween Mummy Cups - www.thelifeofawannabesupermom.blogspot.com

Halloween Mummy Cups - www.thelifeofawannabesupermom.blogspot.com

How I did it: 
What you need: 
- Clear or white plastic cups 
- White Streamers 
- Googly eyes 
- Glue or Glue dots 
- Scissors 

What I did: 
Step 1: Glue or glue dot the googly eyes in place (see photos for placement).
Step 2: Wrap your streamers around the cup and around the eyes gluing here and there as you.  
Step 3: Let dry!  Add a cute paper straw or Halloween straw to finish it off :)

Check out the Spider Plates that go great with these adorable cups!

Halloween Mummy Cups & Spider Plates - www.thelifeofawannabesupermom.blogspot.com

Halloween Mummy Cups & Spider Plates - www.thelifeofawannabesupermom.blogspot.com

Halloween Mummy Cups & Spider Plates- www.thelifeofawannabesupermom.blogspot.com


Friday, October 28, 2011

Spider Plates

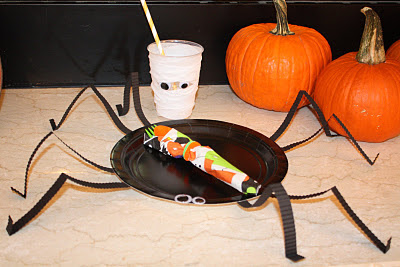
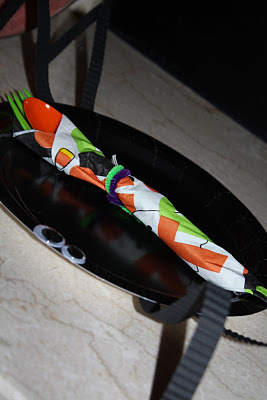
I'm in charge of paper products for Super Kid's FIRST EVER school party. I was overly giddy when I found out they were having a Halloween party, but I was a little disappointed that someone else had already signed up for the cupcakes (I LOVE cupcakes). My only option was the fresh fruit or paper products, so I picked the paper products, because really... what fun can you have with fruit that HAS to be cut into bite sizes?? Anyway, Here's the Spider Plates and silverware (cups are coming in a later post, because they're still drying)! 

Halloween Spider Plates - www.thelifeofawannabesupermom.blogspot.com

Halloween Spider Plates - www.thelifeofawannabesupermom.blogspot.com

Halloween Spider Plates - www.thelifeofawannabesupermom.blogspot.com

Halloween Spider Plates - www.thelifeofawannabesupermom.blogspot.com

Halloween Spider Plates - www.thelifeofawannabesupermom.blogspot.com

Halloween Spider Plates - www.thelifeofawannabesupermom.blogspot.com

How I did it:
What you need:
*8 1/2x11 cardstock in black
*Black Paper Plates
*Googly eyes
*Paper Crimper
*Hot Glue Gun
*Paper Cutter or Scissors

What I did:
Step 1: Cut black cardstock into 8 1/2 inch by 1/2 inch strips (8 strips per plate).
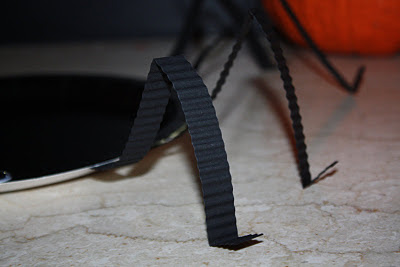
Step 2: Crimp each strip using a paper crimper.
Step 3: Hot glue strips onto plate and then bend each strip in half and then bend a small tab on the end.
Step 4: Hot glue googly eyes! I used two different sizes for a fun, corky look.

I unfortunately can't take credit for this super cute idea. Here's the original tutorial


"123" Fall Ribbon Wreath

I made this wreath for Super Kid's classroom at school. I used 4 different fabrics (approximately 1 1/2 yards of each).

"123" Fall Ribbon Wreath - www.thelifeofawannabesupermom.blogspot.com

I attached "123" letters that were AWESOMELY spray painted yellow by Super Husband. I chose yellow over orange or decoupaging with a matching fabric so that they would stand out a little better :) Here's the result!

"123" Fall Ribbon Wreath - www.thelifeofawannabesupermom.blogspot.com

How I did it:

What you need:
*(4) Different types of fabric (approx. 1/2 yard of each)
*Small Wire Wreath (I found mine at Joann's for about $2)
*Ribbon (for hanging)
*Scissors
Optional:*Letters/Numbers
*Spray paint for letters/numbers
*Hot Glue Gun
*Bobby Pins (1 per letter/number)

What I did:
Step 1: Cut fabric into 6 inch long x 1 inch wide strips.
Step 2: Tie strips (I double knotted) onto the wire wreath in a random pattern. I made sure not to put too similar of colors next to each other. You will be tying for a long, long, long, long, long, extra long time.
Step 3: Tie ribbon on top to create a hanger.
OPTIONAL Step 4: Spray paint letters/numbers. Straighten bobby pins and then bend a hook. Hot Glue bobby pins to letters/numbers. Put the bobby pin hook THROUGH the closest knot to the location you want the letter/number. Squeeze the bobby pin hook to tighten.

And you're done! I think I covered everything, but comment if you have any questions!


Wednesday, October 19, 2011

Dry Erase Menu

The little scrap of paper with the weekly menu on it just wasn't cutting it anymore. First of all, I'd lose it. Secondly, I found myself staring blankly into the refrigerator trying to remember why I bought that bottle of Italian French BBQ Balsamic sauce. Ok, so that's not a real product, thank goodness... because that would probably be gross and eliminate my need for a menu all together (per request of my family). Anyway, you get my drift. The paper just wasn't going to work. So, on another day that I found myself sucked into Pinterest yet again, I came across this. The original menu is ADORABLE, but I wanted a dry erase menu since I already use a dry erase calendar on my refrigerator. Using the chalkboard menu as my inspiration, I came up with this!

Dry Erase Menu - www.thelifeofawannabesupermom.blogspot.com

Dry Erase Menu - www.thelifeofawannabesupermom.blogspot.com

Dry Erase Menu - www.thelifeofawannabesupermom.blogspot.com

How I did it:
What you need:

*8 1/2x11 or 12x12 scrapbook paper with design of your choice
*Alphabet scrapbook stickers (or you can just write it with a marker yourself)
*Decorative accent (mine is a scrapbooking flower with sticky adhesive on the back, so no gluing for me!)
*8x10 frame
*Scissors
*Ruler

What I did:

Ok, it's so easy, I'm not even going to give out steps. Cut paper to size. Put letters on the paper using the stickers or by writing it with a marker. Put it in the frame, stick or glue your decorative accent on it and you're done!

Dry Erase Menu - www.thelifeofawannabesupermom.blogspot.com


Tuesday, October 18, 2011

BJJ Hair Mission

I've been on a mission to discover the perfect hairstyle for when I'm at Jiu Jitsu. I've got pretty long hair (below the middle of my back) and it's a never-ending battle trying to find a way to wear it where I won't get choked out with it. There's nothing worse than tapping out because of your HAIR. It's been pulled (and pulled out), wrapped around my neck (by itself, not by someone, haha), in my face, and the worst one: Stuck underneath me between my back and the mat. This leaves one in the horrible position of chin up, throat/neck exposed, and NOWHERE to go.

My last BJJ class, I french braided my bangs to one side and that worked AWESOMELY. Unfortunately, I'm not coordinated enough (or at all really) to french braid the back of my hair myself, so at my next BJJ class, I'm off to find a style for the back. A regular ponytail is too long (still get the stuck under the back thing) and anything else falls out. I will be attempting... wait for it...

The Princess Leia buns. Or a version of it, anyway.
It won't be over the ears or as big as Leia's -

But will be braided and smaller. So, we'll see.

The ultimate goal: Do not get choked out by one's own hair.


Thursday, October 13, 2011

Technology Tickets

Like so many others, I find A LOT of inspiration on the popular website Pinterest. I came across this idea for Technology Tickets and it couldn't have come at a better time!

Super Kid has an unhealthy obsession with playing on his LeapPad, our iPad, and our Droid cell phones. If I'm not careful, he has been known to sneak off with one of these and play for long periods of time. So, I decided to try out the "Technology Ticket" idea I found on Pinterest.

How it works:

He earns 10 tickets every week, which are good for 30 minutes of "Technology Time" each. There are also 10 Reward tickets that we can reward him with for being good, doing well at school, etc. He also has a "Responsibility Chart" that if he fills every square by completing each task (i.e. Making his bed; Saying "Please" & "Thank You", etc) for the week, he earns a reward at the end of the week - so we can use this as a reward option for that as well.

How I did it:

What you need:

*(2) 4x6 clear magnetic picture frames (usually really cheap at Walmart, Target, etc)
*(2) 12x12 scrapbook paper, two different, but coordinating patterns (you can also use 8 1/2x11 if you want, but I bought the 12x12 in case I messed something up)
*(2) packs of gift tags (I found mine at Michael's, there were 10 in each pack)
*1-2 rolls of ribbon, depending on how large you want your ribbon at the top. (I used a 3 yard roll and it worked out great for 20 tickets. I did about 5 1/4 inch length for each one.)
*Hot glue
*Stickers (optional) (I found mine at Michael's on clearance)
*Marker

What I did:
Step 1: I cut the scrapbook paper for the background to the size of the magnetic frame. Slip the paper into the frame and VOILA, you have a background! If there is any extra paper hanging on the outside, just trim right from inside the frame.

Step 2: Cut the scrapbook paper for the front pocket. I cut it large enough to go from the bottom of the magnet (if your magnet is in the middle of the frame) to the bottom of the frame. Approximately 2 1/2-3 inches. As far as length, just long enough to reach the back of the frame. No one's going to see the back, so use your own discretion.

Technology Tickets - www.thelifeofawannabesupermom.blogspot.com

Technology Tickets - www.thelifeofawannabesupermom.blogspot.com

Step 3: Hot glue the pocket to the front. I used hot glue because I find it more durable and long lasting... and let's face it, CHEAP.

Step 4: Stick your stickers on your gift tags and write "Technology Ticket" on 10 of them and "Reward" on the other 10. If you don't want to use stickers, that's fine! Just write it straight on the tag!

Step 5: Cut your ribbon to desired length. I believe mine were about 5 1/4 inch long each. I used a 3 yard roll of ribbon. Tie your ribbon to your gift tags.

Technology Tickets - www.thelifeofawannabesupermom.blogspot.com

Step 6: You're done! Stick the frames on the fridge, stick the tickets in it, and start using it!
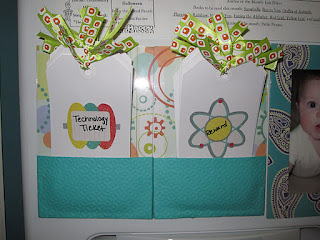
Technology Tickets - www.thelifeofawannabesupermom.blogspot.com


Monday, October 3, 2011

The Life of a Wanna-Be Super Mom Backstory

I'm Megan and I'm a Wanna-Be Super Mom. I don't think I'll ever reach the official title of "Super Mom," but here I will posting all of my attempts. I have a 4 year old son, Super Kid, and a great husband, Super Husband. I love crafting and DIYing. I love baking. I love Brazillian Jiu Jitsu. I love photography. I love graphic design. But most of all, I love my family and I strive to be the best I can be for them.

I'll be posting my adventures in crafting/DIYing, baking, Brazillian Jiu Jitsu, photography, and party planning. Yes, I know a strange mix of things, but strange mixes of things is what makes life great :)