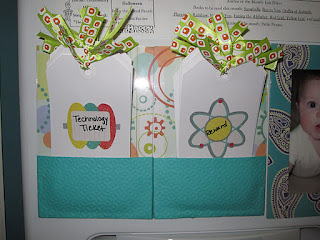
Super Kid has an unhealthy obsession with playing on his LeapPad, our iPad, and our Droid cell phones. If I'm not careful, he has been known to sneak off with one of these and play for long periods of time. So, I decided to try out the "Technology Ticket" idea I found on Pinterest.
How it works:
He earns 10 tickets every week, which are good for 30 minutes of "Technology Time" each. There are also 10 Reward tickets that we can reward him with for being good, doing well at school, etc. He also has a "Responsibility Chart" that if he fills every square by completing each task (i.e. Making his bed; Saying "Please" & "Thank You", etc) for the week, he earns a reward at the end of the week - so we can use this as a reward option for that as well.
How I did it:
What you need:
*(2) 4x6 clear magnetic picture frames (usually really cheap at Walmart, Target, etc)
*(2) 12x12 scrapbook paper, two different, but coordinating patterns (you can also use 8 1/2x11 if you want, but I bought the 12x12 in case I messed something up)
*(2) packs of gift tags (I found mine at Michael's, there were 10 in each pack)
*1-2 rolls of ribbon, depending on how large you want your ribbon at the top. (I used a 3 yard roll and it worked out great for 20 tickets. I did about 5 1/4 inch length for each one.)
*Hot glue
*Stickers (optional) (I found mine at Michael's on clearance)
*Marker
What I did:
Step 1: I cut the scrapbook paper for the background to the size of the magnetic frame. Slip the paper into the frame and VOILA, you have a background! If there is any extra paper hanging on the outside, just trim right from inside the frame.
Step 2: Cut the scrapbook paper for the front pocket. I cut it large enough to go from the bottom of the magnet (if your magnet is in the middle of the frame) to the bottom of the frame. Approximately 2 1/2-3 inches. As far as length, just long enough to reach the back of the frame. No one's going to see the back, so use your own discretion.


Step 3: Hot glue the pocket to the front. I used hot glue because I find it more durable and long lasting... and let's face it, CHEAP.
Step 4: Stick your stickers on your gift tags and write "Technology Ticket" on 10 of them and "Reward" on the other 10. If you don't want to use stickers, that's fine! Just write it straight on the tag!
Step 5: Cut your ribbon to desired length. I believe mine were about 5 1/4 inch long each. I used a 3 yard roll of ribbon. Tie your ribbon to your gift tags.

Step 6: You're done! Stick the frames on the fridge, stick the tickets in it, and start using it!


No comments:
Post a Comment