
I've been attempting to do little projects with Super Kid while he is out of school for the summer. I came across this project at The Artful Parent, who has an amazing blog and ideas! I'll be posting a few other projects found there as well. Anyway, Super Kid has an overabundance of crayons. He really has an obsession, I think. He may get it from his Mama, who may have a slightly unhealthy obsession with office and craft supplies. Come on, nothing wrong with that! ;)
I asked him to go through his crayon box and pick out all of the broken crayons and to put them into a Ziploc bag. He came back with a handful of crayons, which I thought would surely NEVER be enough for this project, but we started got the grater out and went for it.
FYI: You may want to either 1. sacrifice your grater for this project or 2. buy a cheap grater to use for crafting. Not thinking about it, I used my grater from my kitchen and it is now officially a crafting grater.
I apologize for not taking step-by-step pictures of this project, but I did it very similarly to how The Artful Parent did it :)
How I did it:
What you need:
- Crayons (this is a great way to use broken crayons!)
- Grater (please see "FYI" above)
- Wax paper
- Iron
- Old towel
- Large paper (I used craft paper, but paper grocery bags would work great as well)
- Scissors
- Hole puncher
- Ribbon
What I did:
Step 1: Start grating your crayons. This will take a little while and I suggest doing it on a covered table and outside! We somehow made quite the mess doing this step. You can grate colors of similar shades together over a paper plate and then add that color group to a muffin tin section or separate containers to keep the colors divided. We did blue and purple together and red and orange together, etc.
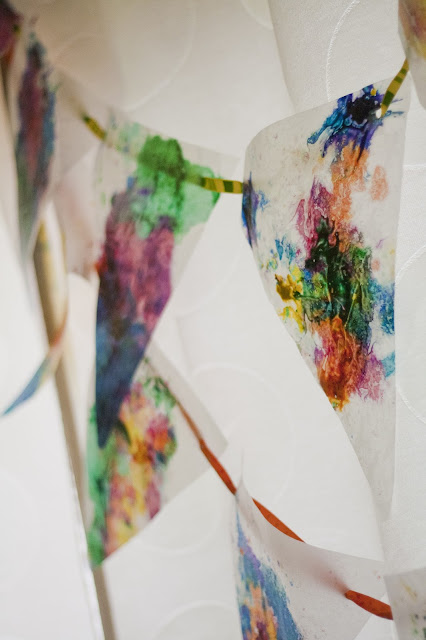
Step 2: Cut wax paper large enough to fold in half and still have enough space to cut a triangle for the bunting. The pictures under step 4 shows the wax paper folded over, but pre-cut to get an idea of size.
Step 3: Sprinkle crayon shavings onto one side of the wax paper in different color combinations and patterns. Try to stay a couple of inches away from the edges or this will leak out when you iron it.
Step 4: As Super Kid sprinkled the wax paper, I took the ones he was finished with and ironed them. Before you start ironing, STOP! I put an old towel on the counter with a large folded paper over it. I placed the wax paper (which is folded in half!) in between the paper and ironed it. I had my iron on medium-high. It didn't take but about 20 seconds to get the shavings to melt. As I finished them, I hung them with clothes pins to dry until we finished all of them (we did 14 total).


Step 5: Cut your triangles for the bunting. I cut one and then used that one as my cutting template for the others. You may need to get a little creative on the cutting if the crayons shavings were more abundant on one side.
Step 6: After you have all of your triangles cut, punch holes on the sides for the ribbon.
Step 7: String your ribbon through your triangles. We used ribbon we had on hand, so we made two sets of bunting to accommodate our ribbon length.
Step 8: Hang your bunting and enjoy! We have our stained glass bunting hanging from our sliding door curtain rod. It looks so pretty when we open the curtains!


No comments:
Post a Comment